table of contents
Introduction
Propagation by seedling is an essential practice for orchid growers, offering a rewarding way to expand your plant collection. In this section, we’ll explore the importance of this process and the emotional benefits of seeing your orchids flourish from cuttings. Discover how propagation by seedling can be an enriching experience for any orchid enthusiast.
1. Identifying the Ideal Time for Propagation
When propagating orchids by cuttings, it is crucial to choose the right time to ensure the success of the process. Here are some guidelines for identifying the ideal time:
Indicative Signs:
- Healthy Roots: Check that the orchid has healthy, vigorous roots, indicating a good nutritional state.
- Flowering Complete: Wait until the flowering period is over, suggesting that the plant has directed its energy towards developing new shoots.
- Mature pseudobulbs: Make sure that the pseudobulbs are mature and look firm and healthy.
Careful observation of these signs will allow you to choose the ideal time to cuttings, promoting a successful propagation process.
2. Preparing the materials for propagation by cuttings
Before starting the process of orchid propagation by cuttings, it is essential to have all the necessary materials to hand. Here is a comprehensive list of the items you will need, along with substrate and container guidelines:
Materials List:
- Sterilized pruning shears: To cut accurately without causing damage to the plant.
- Rooting hormone: Facilitates the development of healthy roots in the new seedling.
- Suitable substrate: Choose a substrate that is suitable for orchids, light and well-drained.
- Small, transparent container: Makes it easier to observe root development.
- Pot for transplanting: Prepare a suitable pot for the next phase of the seedling’s life.
Make sure you have all these materials available and ready before you start the process, ensuring a smooth and effective propagation of your orchids.
3. Orchid Seedling Extraction Steps
Extracting the seedling is a crucial step in the propagation process, and it’s important to carry out this procedure carefully so as not to harm the mother plant. Here are the recommended techniques and precautions:
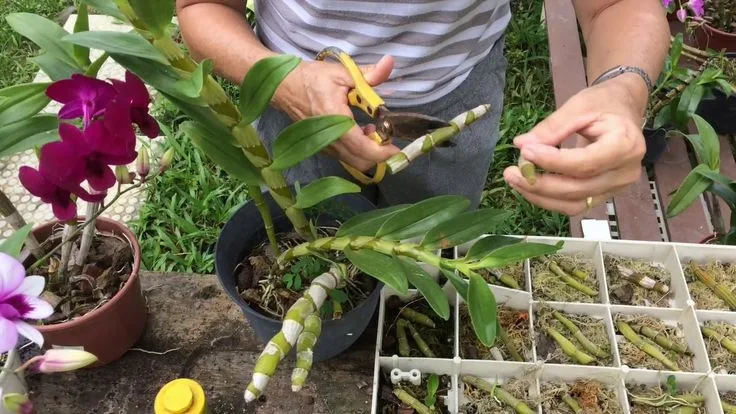
Techniques for Removing the Cuttings:
- Precise identification: Locate the new shoots and pseudobulbs to be removed.
- Surgical cut: Use sterile pruning shears to cut the seedling as close as possible to the mother plant.
Care when handling roots and pseudobulbs:
- Avoid damage: Handle roots and pseudobulbs carefully to avoid damaging the structure of the plant.
- Hygiene: Make sure tools are clean and sterilized to prevent infection.
By following these steps precisely, you will promote efficient and safe seedling extraction, guaranteeing the well-being of the mother plant during the propagation process.
4. Preparing the cutting for planting and stimulating rooting
After extracting the cutting, it is crucial to prepare it properly to promote healthy rooting. Here are the recommended steps:
Cleaning and preparing the roots:
- Removing residues: Gently clean the roots, removing residues from the previous substrate.
- Careful inspection: Check the roots for damage or compromised areas.
Rooting stimulation:
- Rootinghormones: If necessary, apply a rooting hormone to the cut ends to stimulate root development.
This care ensures that the cutting is ready for its next stage of growth, promoting strong and healthy rooting.
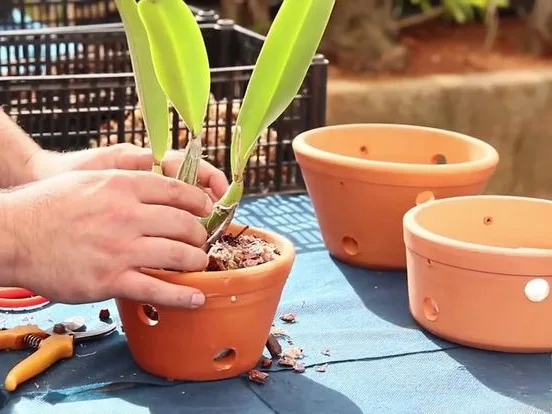
5. Proper Orchid Seedling Planting
Planting the seedling is a critical phase for its healthy development. Here are the guidelines to ensure proper planting:
Depth and Spacing:
- Correct depth: Plant the seedling at the same depth as the mother plant, keeping the base of the pseudobulbs at the level of the substrate.
- Adequate spacing: Leave enough space between the seedlings to allow for healthy growth, avoiding competition for resources.
Efficient drainage:
- Choice of container: Make sure the new container has good drainage to avoid water accumulating around the roots.
- Appropriate substrate: Use a light, well-drained substrate to encourage root development.
By following these guidelines, you will promote an environment conducive to the initial growth of the seedling, contributing to its future flowering.
6. Post-planting Orchid Seedling Care
After planting, it is crucial to provide adequate care to ensure the adaptation and healthy development of the seedling. Here are the post-planting instructions:
Watering and Humidity:
- Moderate watering: Avoid overwatering, allowing the substrate to dry out slightly between waterings.
- Humidity monitoring: Maintain an environment with adequate humidity levels, especially if the orchid is adapting to a new container.
Initial protection:
- Controlled environment: Protect the seedling from extreme conditions such as strong winds and direct sunlight in the early stages.
- Regular monitoring: Observe the seedling regularly to detect signs of adaptation and possible problems.
This post-planting care is essential for establishing a solid foundation and promoting the healthy growth of your newly planted orchid.
7. Monitoring Orchid Seedling Development
Careful monitoring of the seedling’s development is crucial to ensure a successful transition to the permanent pot. Here are the guidelines for monitoring:
Monitoring Root Growth:
- Regular inspection: Examine the roots periodically to observe growth and identify possible problems.
- Healthy roots: A robust root system indicates good development.
Signs of Readiness for Transfer:
- Involvement of the pot: When the roots begin to wrap around the substrate, it’s a sign that the seedling is ready for a larger container.
- New growth: The presence of new pseudobulbs and shoots indicates positive development.
By following these indications, you’ll be prepared for a successful transfer, giving your orchid the space it needs to thrive.
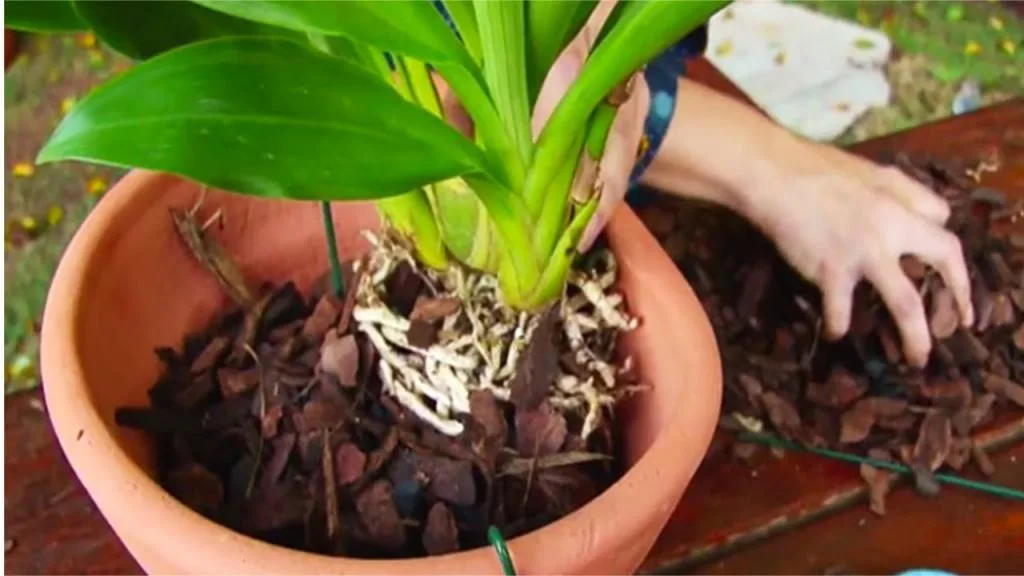
8. Transplanting the Orchid Seedling into the Final Pot
Transplanting to the final pot marks a crucial stage in orchid cultivation. Follow these steps to ensure a successful transplant:
Transplant Steps:
- Careful removal: Remove the seedling from the temporary pot, handling it gently to avoid damaging the roots.
- Preparing the new pot: Make sure the new container has good drainage and is the right size for the orchid’s continued development.
- Correct positioning: Plant the seedling at the same depth as it was in the temporary pot, keeping the consistency at the level of the substrate.
Adapting to the new environment:
- Moderate initial watering: After transplanting, carry out moderate watering to establish the new substrate.
- Regular monitoring: Observe the orchid over the next few days to ensure a smooth adaptation.
By following these guidelines, you will provide your orchid with the ideal conditions to adapt to its new environment and continue its healthy growth.
Conclusion
In summary, the process of making orchid seedlings involves specific care, from identifying the ideal time to transplanting them into their final pot. To recap the steps:
- Identify the Ideal Moment: Watch for signs such as new pseudobulbs and healthy roots.
- Prepare the Materials: Make sure you have the right substrate and containers for planting.
- Extract the Seedling Carefully: Preserve the roots and pseudobulbs when removing the seedling from the mother plant.
- Prepare the Cuttings for Planting: Clean and apply rooting hormones if necessary.
- Plant Properly: Maintain the correct depth and ensure good drainage in the new container.
- Post-Planting Care: Moderate watering and initial protection to promote adaptation.
By following these steps, you’ll be well on your way to successfully propagating your orchids. We encourage you to try this rewarding process, expand your orchid collection and enjoy the pleasure of growing these magnificent flowers. Grow with love and reap the rewards of a flourishing collection!
Frequently Asked Questions
How do I make an orchid leaf sprout?
Orchid leaf sprouting is a natural process, but it can be stimulated by specific care. Ensure a suitable environment with good lighting, temperature and humidity. Keep the orchid healthy by watering moderately and providing nutrients. Over time, new leaves will emerge, promoting the plant’s exuberant growth.
How do I grow orchid seedlings from the root?
To make orchid seedlings from the root, choose a healthy mother plant with vigorous roots. Remove a portion of the root with a sterilized knife, making sure there are enough roots and pseudobulbs. Plant the removed portion in a suitable substrate, maintaining a humid environment to stimulate rooting. With proper care, the seedling will develop into a new orchid.
How to make orchid cuttings from the stem?
Making orchid cuttings from the stem is an effective technique. Choose a healthy stem, cut it into sections and plant the sections in a suitable substrate. Make sure that each section has knots or roots to encourage development. Provide a humid environment with good lighting to facilitate rooting. With patience and proper care, the cuttings will develop into new orchids.