table of contents
Introduction
Welcome to the fascinating world of pitaya, an exotic fruit that is increasingly finding its way onto tables around the world. Known for its vibrant appearance and unique flavor, pitaya not only captivates the senses, but also offers a variety of nutritional benefits
Pitaya, also known as dragon fruit, originated in regions of Central America, but is now cultivated in several countries. With its scaly skin and juicy flesh, pitaya stands out as a refreshing and delicious option for those seeking new gastronomic experiences.
Main features:
- Vibrant colors: Available in shades of pink, yellow and white, pitaya is a festival of colors in its presentation.
- Refreshing taste: The juicy pulp has a balanced taste between sweet and slightly acidic.
The Importance of Growing Your Own
Engaging in self-growing pitaya is not only a pleasurable activity, but also a way of reaping direct benefits. Let’s look at some reasons to consider growing this exotic fruit in your own space:
1. Health and Nutrition:
- Rich in Antioxidants: Pitaya is a significant source of antioxidants, aiding in cell protection.
- EssentialVitamins: Contains essential vitamins such as vitamin C, which is essential for strengthening the immune system.
2. Sustainability and Eco-friendliness:
- Low Environmental Impact: Home-growing allows the use of sustainable practices, reducing the environmental footprint.
3. Personalized Experience:
- Variety of Species: By growing your own pitaya, you have the freedom to choose from different varieties, exploring unique flavors.
Discover how pitaya can transform not only your diet, but also the way you relate to nature. By growing this exotic fruit, you will not only reap its own nutritional benefits, but also contribute to a more sustainable lifestyle. Get ready to embark on this sensory and nutritious journey with pitaya!

1. Preparing the Soil and Environment
When growing pitayas, proper soil preparation and the creation of a conducive environment are key to ensuring the healthy development and fruit production of this exotic plant. Here are some essential guidelines for preparing the soil and environment:
Well-Drained, Nutrient-Rich Soil
Before planting your pitayas, make sure that the soil offers ideal conditions for root growth and nutrient absorption. Follow these guidelines for healthy soil:
1. Adequate drainage:
- AeratedTexture: Choose soil with good aeration to promote efficient water drainage.
- Avoid Compacted Soils: Avoid compacted soils that can restrict root growth.
2. Nutritional Enrichment:
- Adding Organic Matter: Incorporating organic matter, such as compost or well-decomposed manure, will enrich the soil with essential nutrients.
- Soil Analysis: Carry out a soil analysis to identify specific deficiencies and adjust nutrients as necessary.
Choosing the Ideal Site
Careful selection of the planting site plays a crucial role in the success of pitaya cultivation. Consider the following factors when choosing a site:
1. Adequate light:
- Full sun: Pitaya thrives in sunny locations. Choose a location that receives at least 6 to 8 hours of direct sunlight daily.
- Avoid Excessive Shading: Avoid areas with excessive shading, as this can negatively affect fruit production.
2. Wind Protection:
- Create Natural Barriers: Plant shrubs or trees around the site to create natural barriers against strong winds.
- Install Protective Screens: In more exposed areas, consider installing protective screens to reduce the impact of the wind.
By following these guidelines, you will be setting the stage for successful pitaya cultivation. Remember to adapt the practices according to the specific conditions in your region, thus providing an ideal environment for this fascinating dragon fruit to flourish.
2. Pitaya planting
Planting time is crucial for laying the solid foundations for the healthy development of pitayas. Follow these detailed steps, from the choice of seedlings to the correct depth, to ensure a successful planting:
Choosing seedlings
Before you start planting, select your pitaya seedlings carefully. Opt for healthy, vigorous seedlings, observing the following characteristics:
1. Seedling health:
- No Signs of Disease: Choose seedlings free of any signs of disease or infestation.
- Well-developed roots: Check that the roots are well-developed and undamaged.
2. Suitable Variety:
- Choice of Species: Select the pitaya variety best suited to the conditions in your region and your growing preferences.
Depth and spacing
Once you’ve selected the ideal seedlings, it’s time to plant the pitayas. Follow these guidelines to ensure proper positioning in the soil:
1. Correct Depth:
- Proper Dig: Dig holes deep enough to accommodate the seedling’s roots.
- Soil Level: Plant the seedlings so that the soil level of the seedling is the same as that of the surrounding soil.
2. Adequate spacing:
- Consider Future Growth: Leave adequate spacing between seedlings, taking into account the plant’s expansive growth.
- Avoid Crowding: Avoid planting too close together to ensure good air circulation and prevent phytosanitary problems.
Initial care
After planting, it is essential to provide the necessary initial care for the pitayas to establish themselves successfully:
1. Adequate irrigation:
- Regular Watering: Maintain a regular watering regime, especially during the first few months after planting.
- Avoid Waterlogging: Avoid waterlogging the soil by ensuring efficient drainage.
2. Protection from the elements:
- Protection Against Extreme Temperatures: Protect the seedlings from extreme temperatures, using covers or temporary structures if necessary.
By following these detailed steps, you’ll be well on your way to successfully planting pitayas. Remember to adapt the practices according to the specific conditions in your region and monitor the growth of the plants for continuous adjustments, ensuring healthy development over time.

3. Watering and nutrition
When growing pitayas, watering and nutrition play crucial roles in vigorous development and fruit production. This guide covers essential watering and fertilizing practices to ensure that your pitayas receive proper care.
Watering Guide
Pitaya is a plant that values a balanced amount of water. Follow these guidelines for efficient watering:
1. Water Requirement:
- Regular Monitoring: Keep an eye on the pitaya’s water needs, especially during periods of active growth and flowering.
- Dry Soil on the Surface: Before watering, check that the top layer of soil is dry, but don’t let the plant reach a state of water stress.
2. Frequency and quantity:
- Moderate Watering: Avoid excesses, opting for moderate and regular waterings.
- Adjust Based on Conditions: Adjust the frequency and amount of water based on climatic conditions and soil type.
3. Irrigation System:
- Drip Recommended: The use of drip systems is highly efficient, providing water directly to the roots and avoiding excess moisture on the leaves.
Balanced nutrition
Proper fertilization is essential to promote healthy growth and fruit production. Follow these guidelines for balanced nutrition:
1. Soil Analysis:
- Perform Tests: Perform regular soil analyses to assess nutrient levels and adjust fertilization as needed.
- Correct Deficiencies: Correct specific deficiencies identified in the tests, ensuring that the plant receives all the essential nutrients.
2. Recommended Fertilizers:
- Balanced Fertilizers: Use balanced fertilizers, specially formulated for cacti and succulents.
- Gradual application: Apply fertilizer gradually, avoiding excesses that could damage the roots.
3. Essential Micronutrients:
- Adequate Supplementation: Make sure the pitaya receives essential micronutrients, such as iron and zinc, for robust development.
By following this watering and nutrition guide, you’ll be providing your pitayas with the ideal conditions to thrive. Remember to adjust the practices as necessary, taking into account the specific characteristics of your region and the individual needs of the plants.
4. Management and pruning
Proper management, including correct pruning, is essential to promote healthy branching, abundant flowering and control possible pests and diseases. This guide offers specific instructions for optimizing the growth of your pitayas.
Pruning to stimulate branching and flowering
Strategic pruning plays a vital role in the robust development of pitayas. Follow these guidelines to stimulate branching and flowering:
1. Formative pruning:
- Remove Fragile Shoots: Remove fragile and disorganized shoots to direct the plant’s energy towards healthy growth.
- Stimulate Branching: Promote branching by cutting off the tips of the stems, encouraging new side branches to emerge.
2. Maintenance pruning:
- EliminateWeak Spots: Eliminate weak spots and damaged stems to strengthen the overall structure of the plant.
- Size Control: Keep the size of the plant under control, especially if grown in containers, to make it easier to manage.
3. Pruning after flowering:
- Removing Wilted Flowers: After flowering, remove wilted flowers to redirect the plant’s energy towards fruit development.
Pest and Disease Control
Keeping pitayas healthy involves effective control of common pests and diseases. Use these strategies to keep your plantation problem-free:
1. Regular Inspection:
- Close Observation: Make regular inspections for signs of pests, such as insects or leaf damage.
- Rapid Diagnosis: Identify potential problems quickly in order to take preventative measures.
2. Use of Natural Enemies:
- Controlled Introduction: Consider the controlled introduction of natural enemies, such as ladybugs, to control pests organically.
3. Natural and Chemical Treatments:
- Essential Oils: Use essential oils, such as neem, as a preventative treatment against insects.
- Moderate Fungicides: In the case of fungal diseases, opt for moderate and appropriate fungicides.
4. Hygiene measures:
- Regular Cleaning: Remove fallen leaves and debris from around the plants to reduce the environment conducive to disease.
By incorporating these management and pruning practices into your pitaya cultivation, you will be strengthening the plants’ resistanceand promoting a healthy environment for exuberant flowering. Remember to adapt the strategies as necessary, taking into account the specific conditions of your plantation.
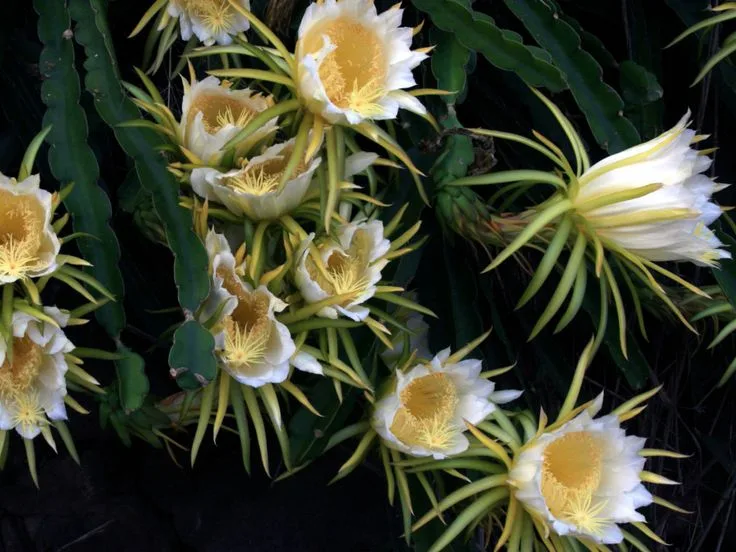
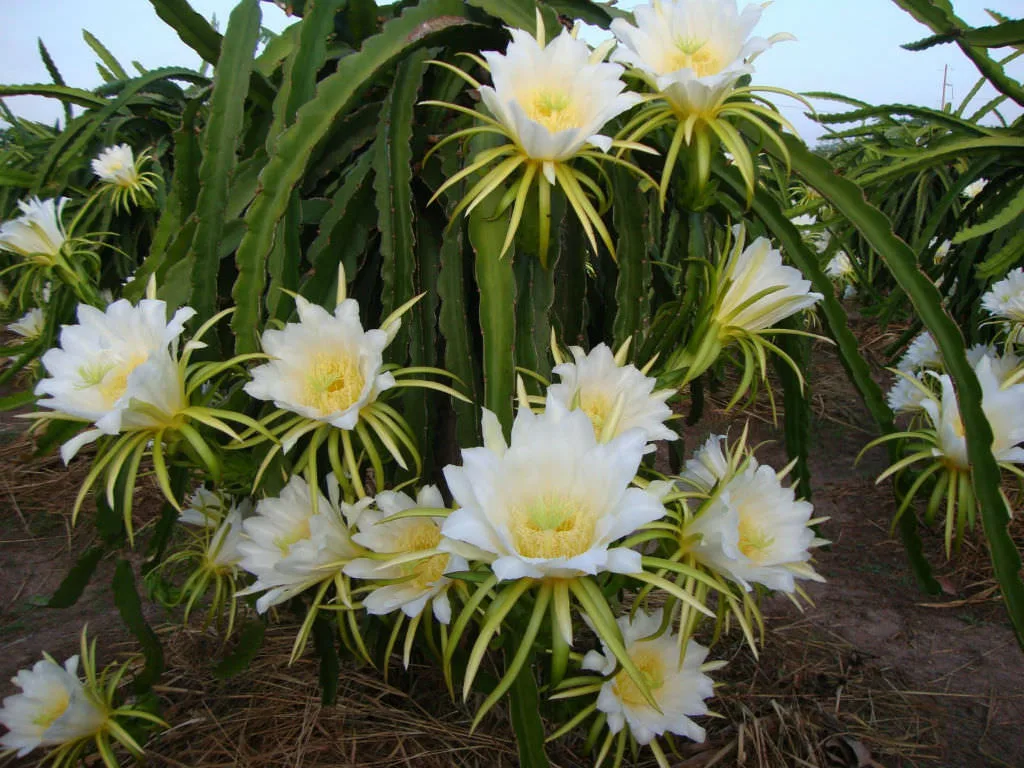
5. Flowering and pollination
Understanding the pitaya life cycle and its flowering phases is crucial to optimizing fruit production. This guide offers specific information on the flowering process and pollination strategies to ensure a bountiful harvest.
Pitaya Life Cycle
Before we dive into flowering, it’s essential to understand the pitaya’s life cycle. The plant goes through several phases, from germination to the production of ripe fruit. We highlight the main phases:
1. Germination and Initial Growth:
- From Seed: Pitaya can be grown from seed, starting life as a small seedling.
- Stem Development: The stems begin to develop, preparing for the vegetative growth phase.
2. Vegetative Growth:
- Establishing Structure: During this phase, the plant focuses its energy on developing a robust structure of stems and leaves.
3. Flowering:
- Emergence of Flower Buds: The flowering phase begins with the emergence of flower buds at the ends of the stems.
- FlowerDevelopment: The flowers open, displaying vibrant colors and marking the beginning of the fruit production potential.
4. Fruiting and ripening:
- Pollinationand Fruit Formation: After successful pollination, the fruit begins to form and ripen.
Manual and Natural Pollination
Pollination plays a crucial role in fruit formation, and pitayas can be pollinated both manually and naturally.
1. Natural pollination:
- Pollinator Attraction: Pitaya flowers are attractive to bees, butterflies and other pollinating insects.
- Pollen transfer: Pollinators transfer pollen from flower to flower, promoting fertilization.
2. Manual pollination:
- Using a Brush or Cotton Swab: To promote manual pollination, use a brush or cotton swab to gently transfer the pollen from one flower to another.
- Conducted in the Morning: Hand pollination is most effective when carried out in the morning, when the flowers are fresh.
Understanding the pitaya’s life cycle and pollination practices is essential to ensure healthy flowering and, consequently, a fruitful harvest. By adopting appropriate strategies, you will be maximizing the potential of your pitaya plantation.

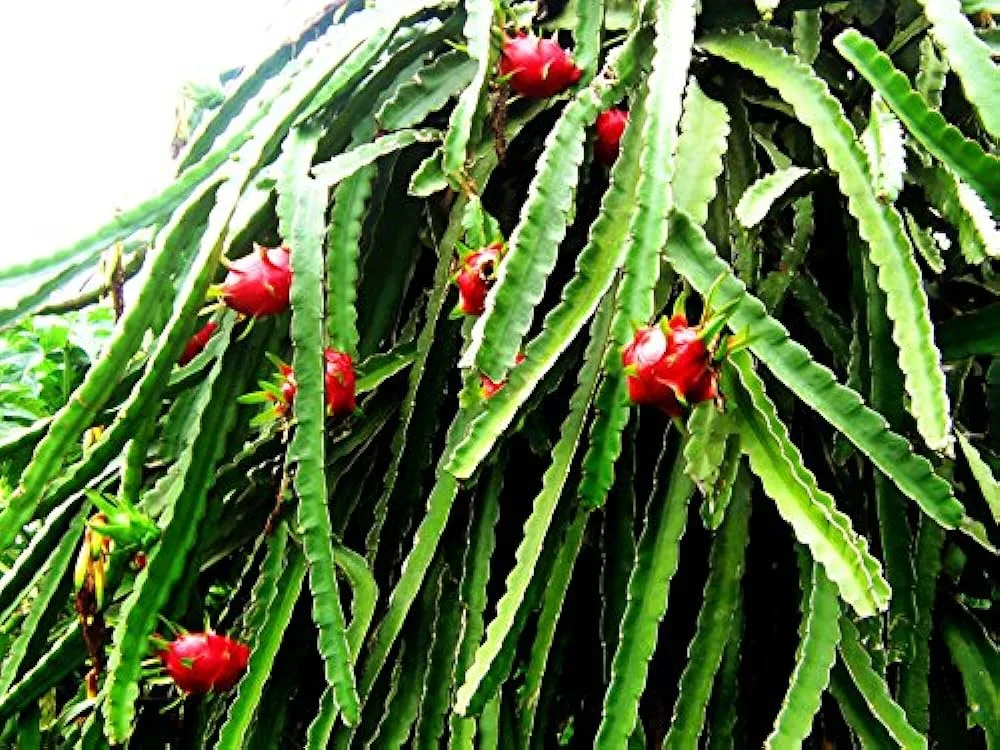
6. Harvesting and storage
The harvest stage marks the culmination of growing pitayas, and proper storage is essential to preserve the freshness of the fruit. This guide offers specific information on the signs of harvest and strategies for prolonged storage.
Signs that Pitaya is Ready to Harvest
Harvesting pitayas at the ideal time is crucial to guaranteeing the taste and quality of the fruit. Look out for the following telltale signs that the pitaya is ready for harvest:
1. Color change:
- Vibrant color: Pitaya reaches maturity when it has a vibrant color, depending on the variety.
2. Peel texture:
- Slight Flexibility: Touch the peel; if it yields slightly under pressure, the pitaya is ready to harvest.
3. Ease of detachment:
- Easy Detachment: The fruit should detach easily from the stem when ripe.
4. Suitable size:
- Stable Size: The size of the pitaya should be stable and consistent with the variety grown.
Tips for Proper Storage and Prolonging Freshness
Proper storage plays a vital role in preserving the freshness of pitayas. Follow these tips to maximize storage time:
1. Refrigerated Storage:
- Immediate Refrigeration: After harvesting, store pitayas in the refrigerator to prolong their freshness.
- Ideal Temperature: Keep pitayas at a temperature between 10°C and 13°C.
2. Suitable packaging:
- Ventilated Packaging: Store pitayas in ventilated bags to avoid moisture accumulation.
- Avoid Compression: Avoid stacking or compressing the fruit, as this can lead to deterioration.
3. Consume quickly:
- Prioritize Consumption: Pitayas are best when consumed quickly. Prioritize consumption within a week of picking.
4. Regular Inspection:
- Removing Damaged Fruit: Check stored pitayas regularly and remove any damaged fruit to prevent the spread of spoilage.
By following these harvesting and storage guidelines, you will ensure that your pitayas reach their peak of flavor and freshness. Make the most of your harvest and enjoy this exotic fruit for a long time to come.
Conclusion
Throughout this comprehensive guide to growing pitaya, we’ve explored the essential steps to ensure successful cultivation and a bountiful harvest. By recapping the fundamental practices, we encourage you to consider growing pitaya in your own space, reaping the benefits of this exotic and nutritious fruit.
Recap of the Essential Steps:
- Preparing the Soil and Environment:
- Choose well-drained, nutrient-rich soil.
- Select a location with adequate light and protection from the wind.
- Pitaya planting:
- Choose healthy seedlings that are appropriate for your region.
- Plant the seedlings at the correct depth and with adequate spacing.
- Watering and nutrition:
- Monitor the pitaya’s water needs and water it moderately.
- Carry out soil analysis and provide a balanced fertilizer.
- Management and pruning:
- Practice pruning to encourage branching and flowering.
- Implement pest and disease control strategies.
- Flowering and pollination:
- Understand the pitaya life cycle, focusing on the flowering phase.
- Explore pollination techniques, whether natural or manual.
- Harvesting and storage:
- Identify the signs of ripeness for harvesting.
- Store pitayas refrigerated, using suitable packaging.
Start Growing Pitayas Yourself!
By following these steps, you’ll be on your way to successfully growing pitayas, ensuring fresh, tasty fruit in your own home. The challenge and reward of growing pitayas not only offers a rewarding experience, but also contributes to a healthier and more sustainable lifestyle.
Don’t wait any longer! Start growing your own pitayas and embark on this delicious journey. Growing your own fruit is a rewarding activity that provides not only fresh food, but also a deeper connection with nature. Harvest what you’ve planted and enjoy the unique flavors of pitaya, transforming your space into an oasis of fresh fruit!
Frequently Asked Questions
Where is the best place to plant pitaya trees?
Pitaya trees thrive best in places that offer full sun exposure, preferably in areas where they receive direct light for at least six hours a day. Well-drained, nutrient-rich soil is essential for the plant’s healthy development. Choosing a location sheltered from strong winds is also beneficial, providing protection from damage and ensuring an environment conducive to pitaya flowering.
How long does it take for a pitaya tree to bear fruit?
The time it takes for a pitaya tree to start producing fruit can vary. Generally, young plants take between 1 and 2 years to reach maturity and start fruiting. However, this timeline can be influenced by factors such as the type of variety, growing conditions, proper care and the surrounding environment. Patience and careful management are essential to ensure a bountiful harvest in the future.
When is the best time to plant pitaya?
The best time to plant pitayas depends on local climatic conditions. In general, planting is most successful when carried out in spring or early summer, when temperatures are warmer and more stable. Avoiding periods of frost and extreme temperatures is crucial for the healthy establishment of seedlings. However, it is always advisable to adapt the planting schedule according to the specific climatic characteristics of the region in which you live.